NetBox Enterprise Installation
Overview
This guide walks through the complete installation process for NetBox Enterprise Embedded Cluster. The installation consists of two main phases: deploying the Kubernetes cluster infrastructure, then configuring and deploying the NetBox application within that cluster.
Expected Duration: 30-45 minutes
Prerequisites
Before beginning installation, ensure you have completed all preparation steps:
Required Preparation
- System prepared: Complete distribution-specific preparation
- Authorization token received: Obtain download token from NetBox Labs
- Hostname finalized: Choose permanent hostname (cannot be changed after installation due to kubernetes limitations)
- IP address finalized: Configure static IP (cannot be changed after installation due to kubernetes limitations)
- Firewall configured: Ensure required ports are open
The hostname and IP address of the host cannot be changed after installation. Finalize these settings before proceeding.
Recommended Preparation
- TLS certificate ready: Prepare custom TLS certificate for admin console (optional, can configure later)
- Database planned: Decide between embedded PostgreSQL or external database
- Cache planned: Decide between embedded Redis or external cache
- Resource allocation planned: Review system requirements
Network Requirements
Verify network connectivity from your installation host:
| Service | URL/Hostname | Purpose |
|---|---|---|
| Download server | app.enterprise.netboxlabs.com | Installer download |
| Container registry | registry.enterprise.netboxlabs.com | Container images |
| License validation | proxy.enterprise.netboxlabs.com | License checking |
For proxy environments, see proxy configuration.
Installation Process
Phase 1: Deploy the Admin Console and Cluster
Step 1: Download Installer
Download the NetBox Enterprise installer package to your prepared host:
# Download installer (replace <token> with your authorization token)
curl -f "https://app.enterprise.netboxlabs.com/embedded/netbox-enterprise/stable" \
  -H "Authorization: <token>" \
  -o netbox-enterprise-stable.tgz
Verify Download:
# Check file size (should be approximately 300 MB)
ls -lh netbox-enterprise-stable.tgz

# Verify file is complete (not empty or truncated)
file netbox-enterprise-stable.tgz
Expected output: netbox-enterprise-stable.tgz: gzip compressed data
- If download fails, verify firewall allows HTTPS to
app.enterprise.netboxlabs.com - For proxy environments, use:
curl -f ... --proxy http://proxy:port ... - Contact NetBox Labs support if authorization token doesn't work
Step 2: Extract and Install
Extract the installer and launch the installation process:
# Extract installer package
tar -xvzf netbox-enterprise-stable.tgz

# Launch installation with license file
sudo ./netbox-enterprise install --license license.yaml
For Proxy Environments:
sudo ./netbox-enterprise install \
  --license license.yaml \
  --http-proxy http://proxy.example.com:8888 \
  --https-proxy http://proxy.example.com:8888
Installation Process:
The installer will:
- Verify system requirements
- Prompt you to create an Admin Console password (save this securely)
- Install embedded cluster components
- Start the Admin Console
Expected Output:
Visit the Admin Console to configure and install netbox-enterprise: http://your-hostname:30000
Installation Duration: 5-10 minutes
Phase 2: Configure and Deploy NetBox
Step 3: Access Admin Console
Open the Admin Console URL in your web browser:
http://your-hostname:30000
Enter the Admin Console password created during installation and click Start.

Step 4: Configure TLS (Optional but Recommended)
The Admin Console initially uses a self-signed certificate. You'll see a TLS warning:
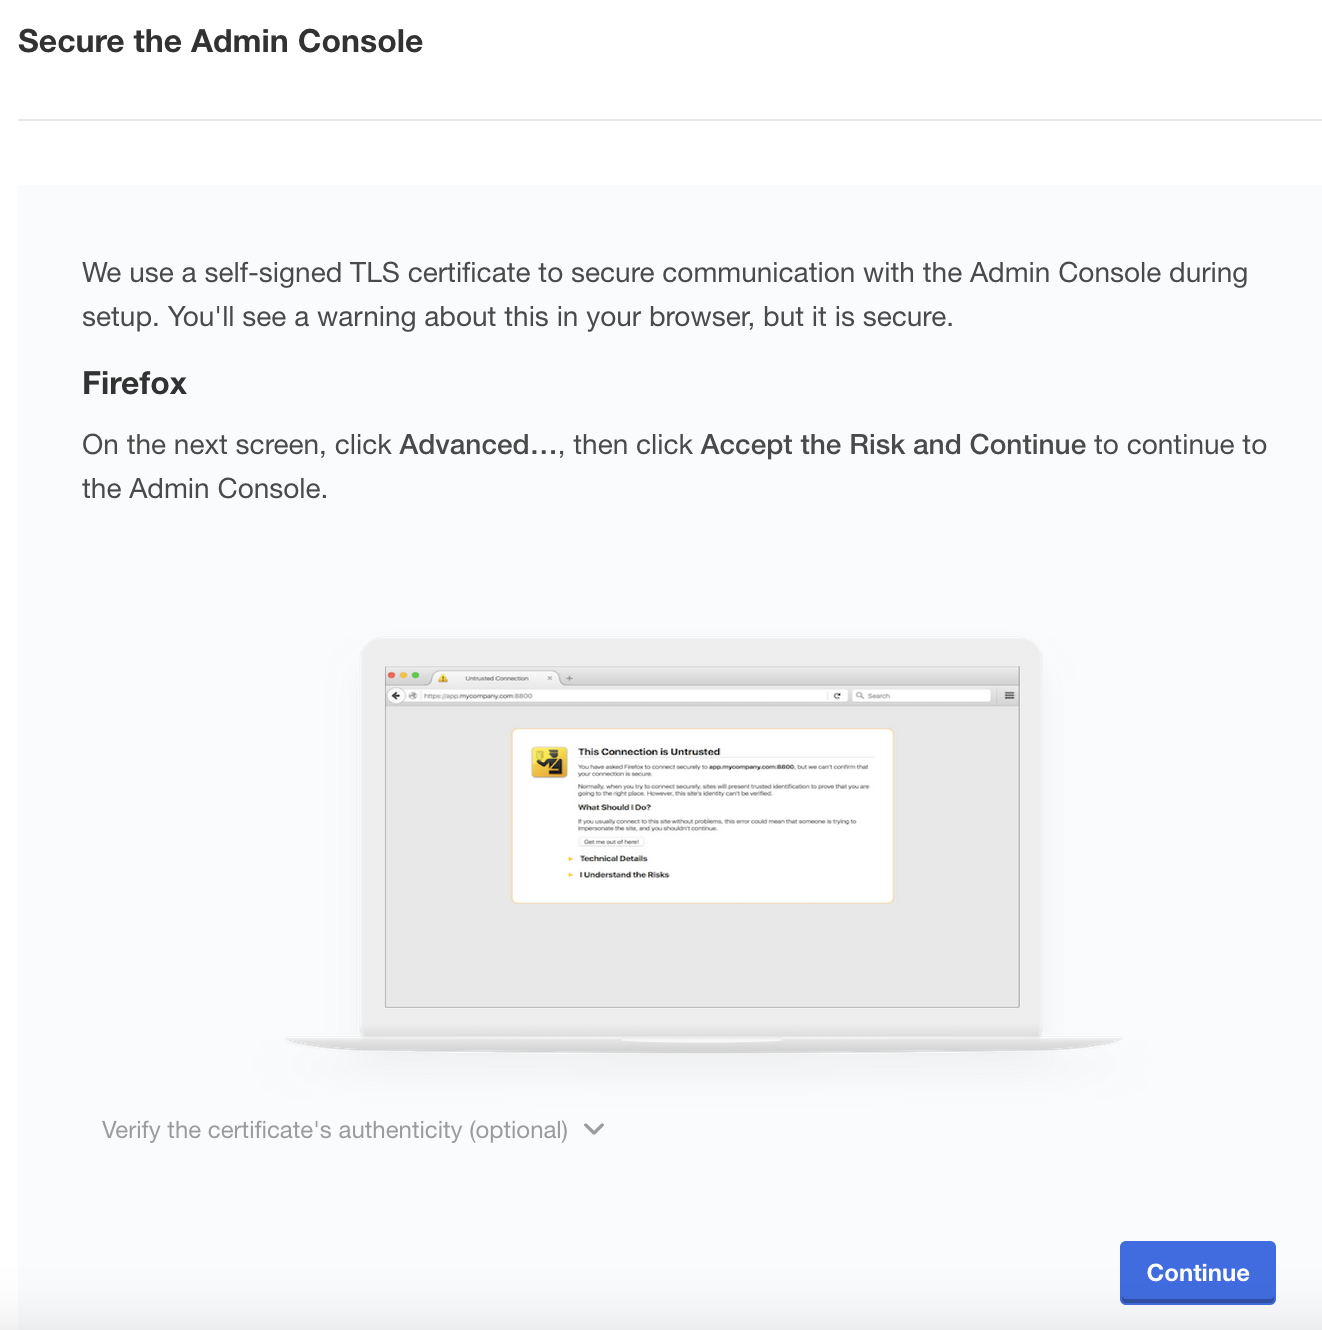
Option A: Accept Self-Signed Certificate (Quickstart)
Click Continue and accept the self-signed certificate in your browser. You can configure a custom certificate later.
Option B: Upload Custom TLS Certificate (Recommended for Production)
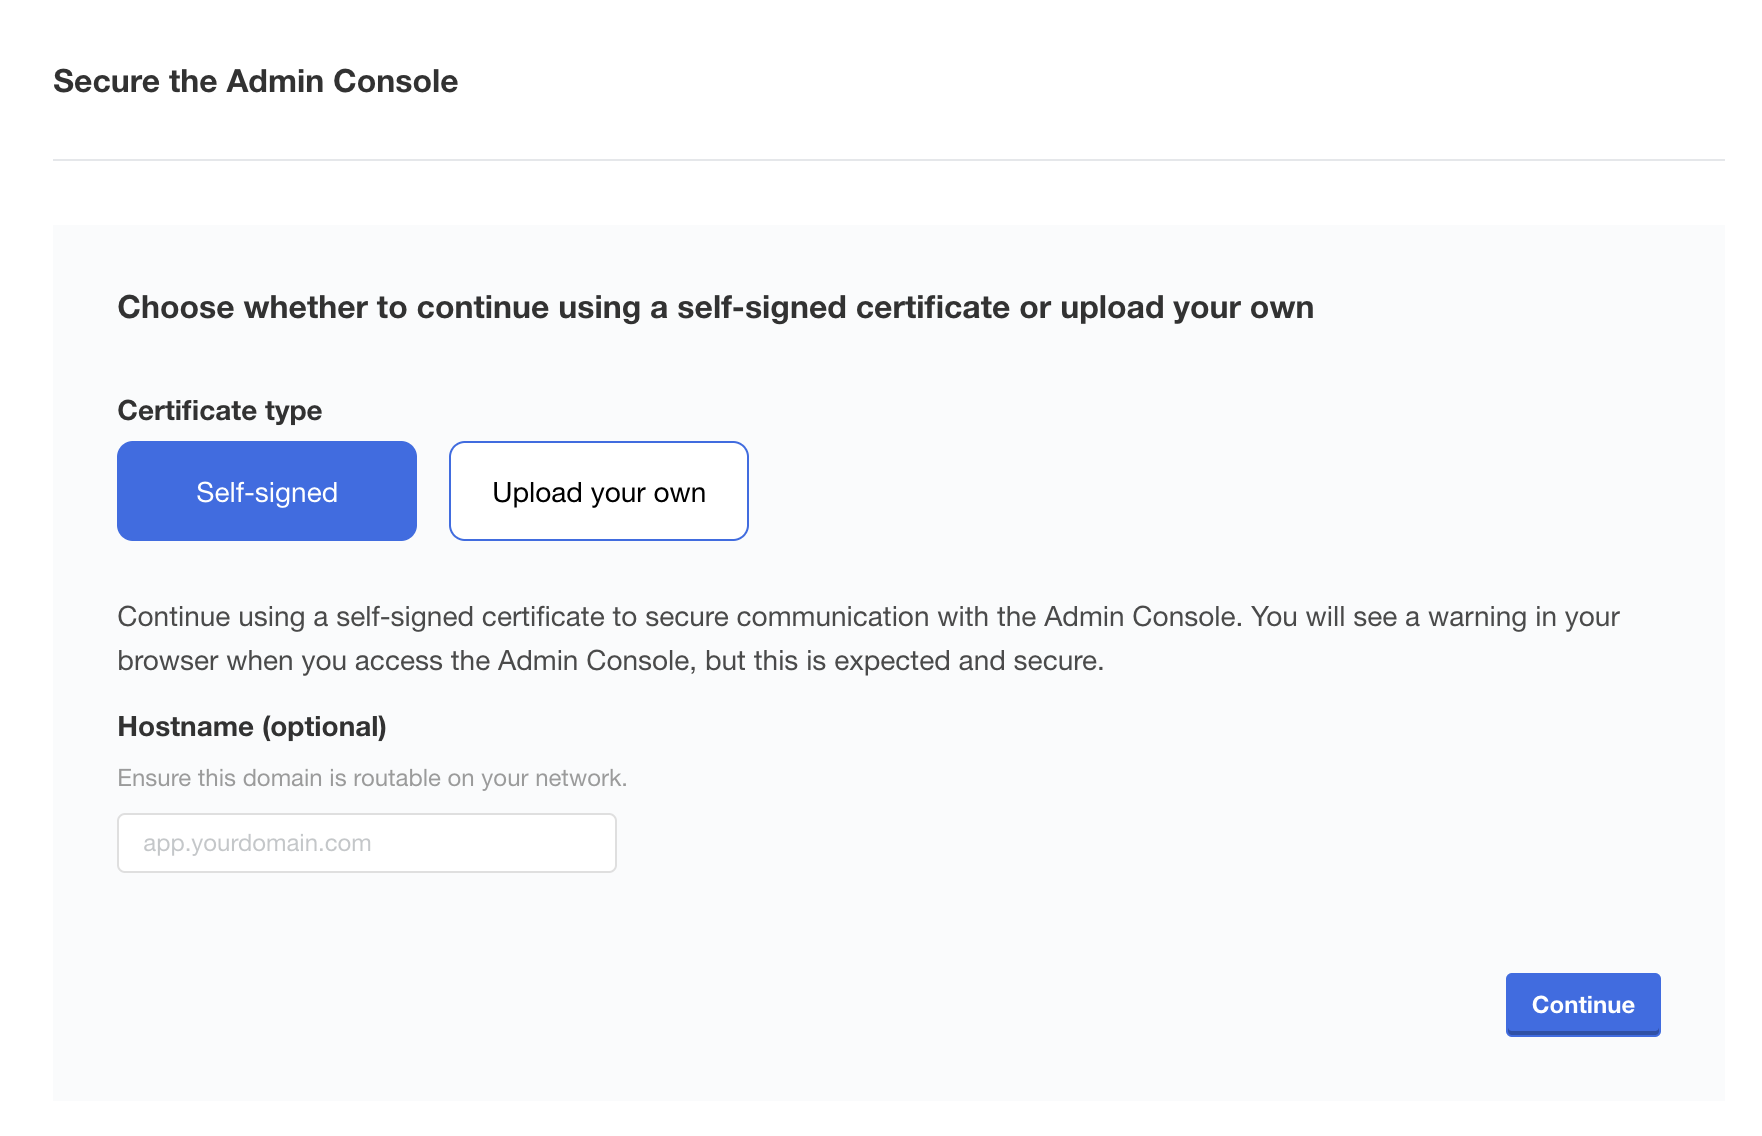
- Set your hostname (FQDN recommended)
- Upload your TLS certificate and private key
- Click
Upload and continue
For detailed TLS configuration, see TLS and Ingress documentation.
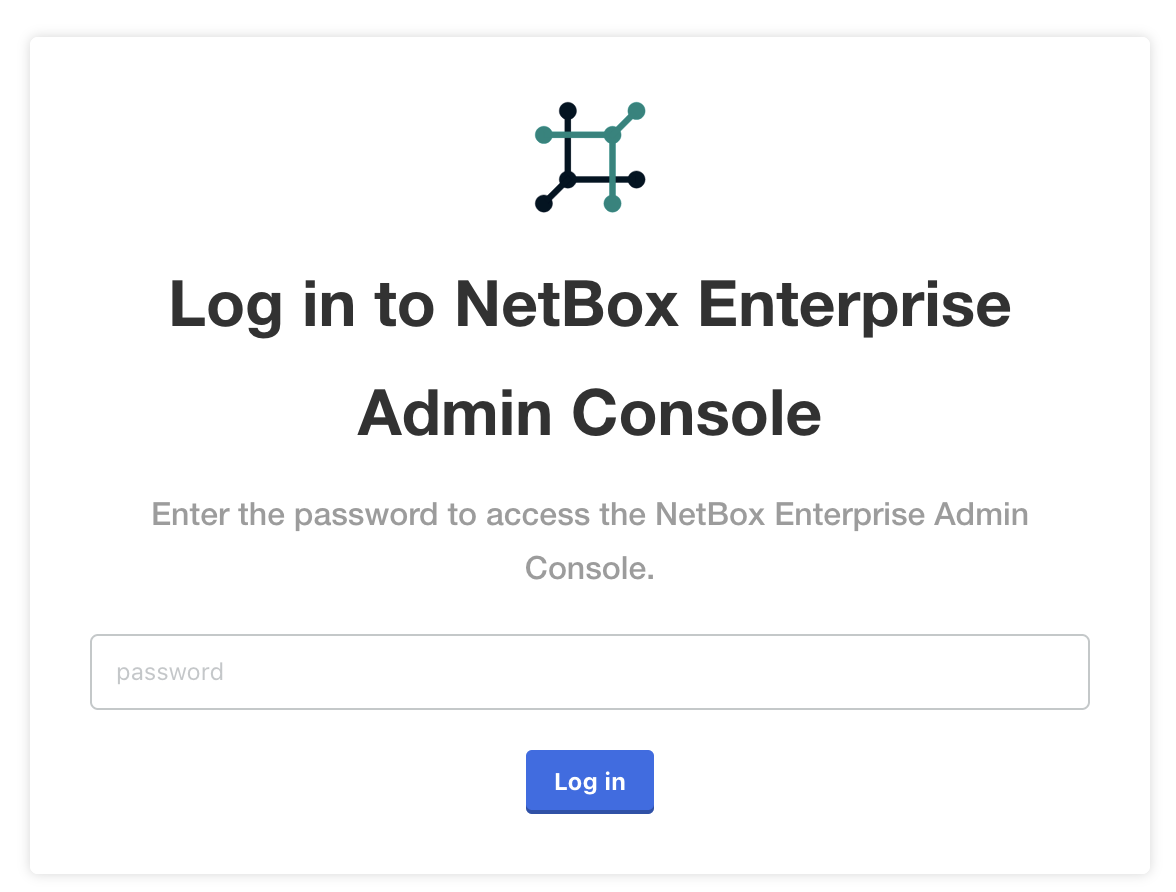
Step 5: Log In to Admin Console
After TLS configuration, log in with your Admin Console password:
Step 6: Cluster Node Configuration
The installer presents an option to add additional nodes to the cluster:
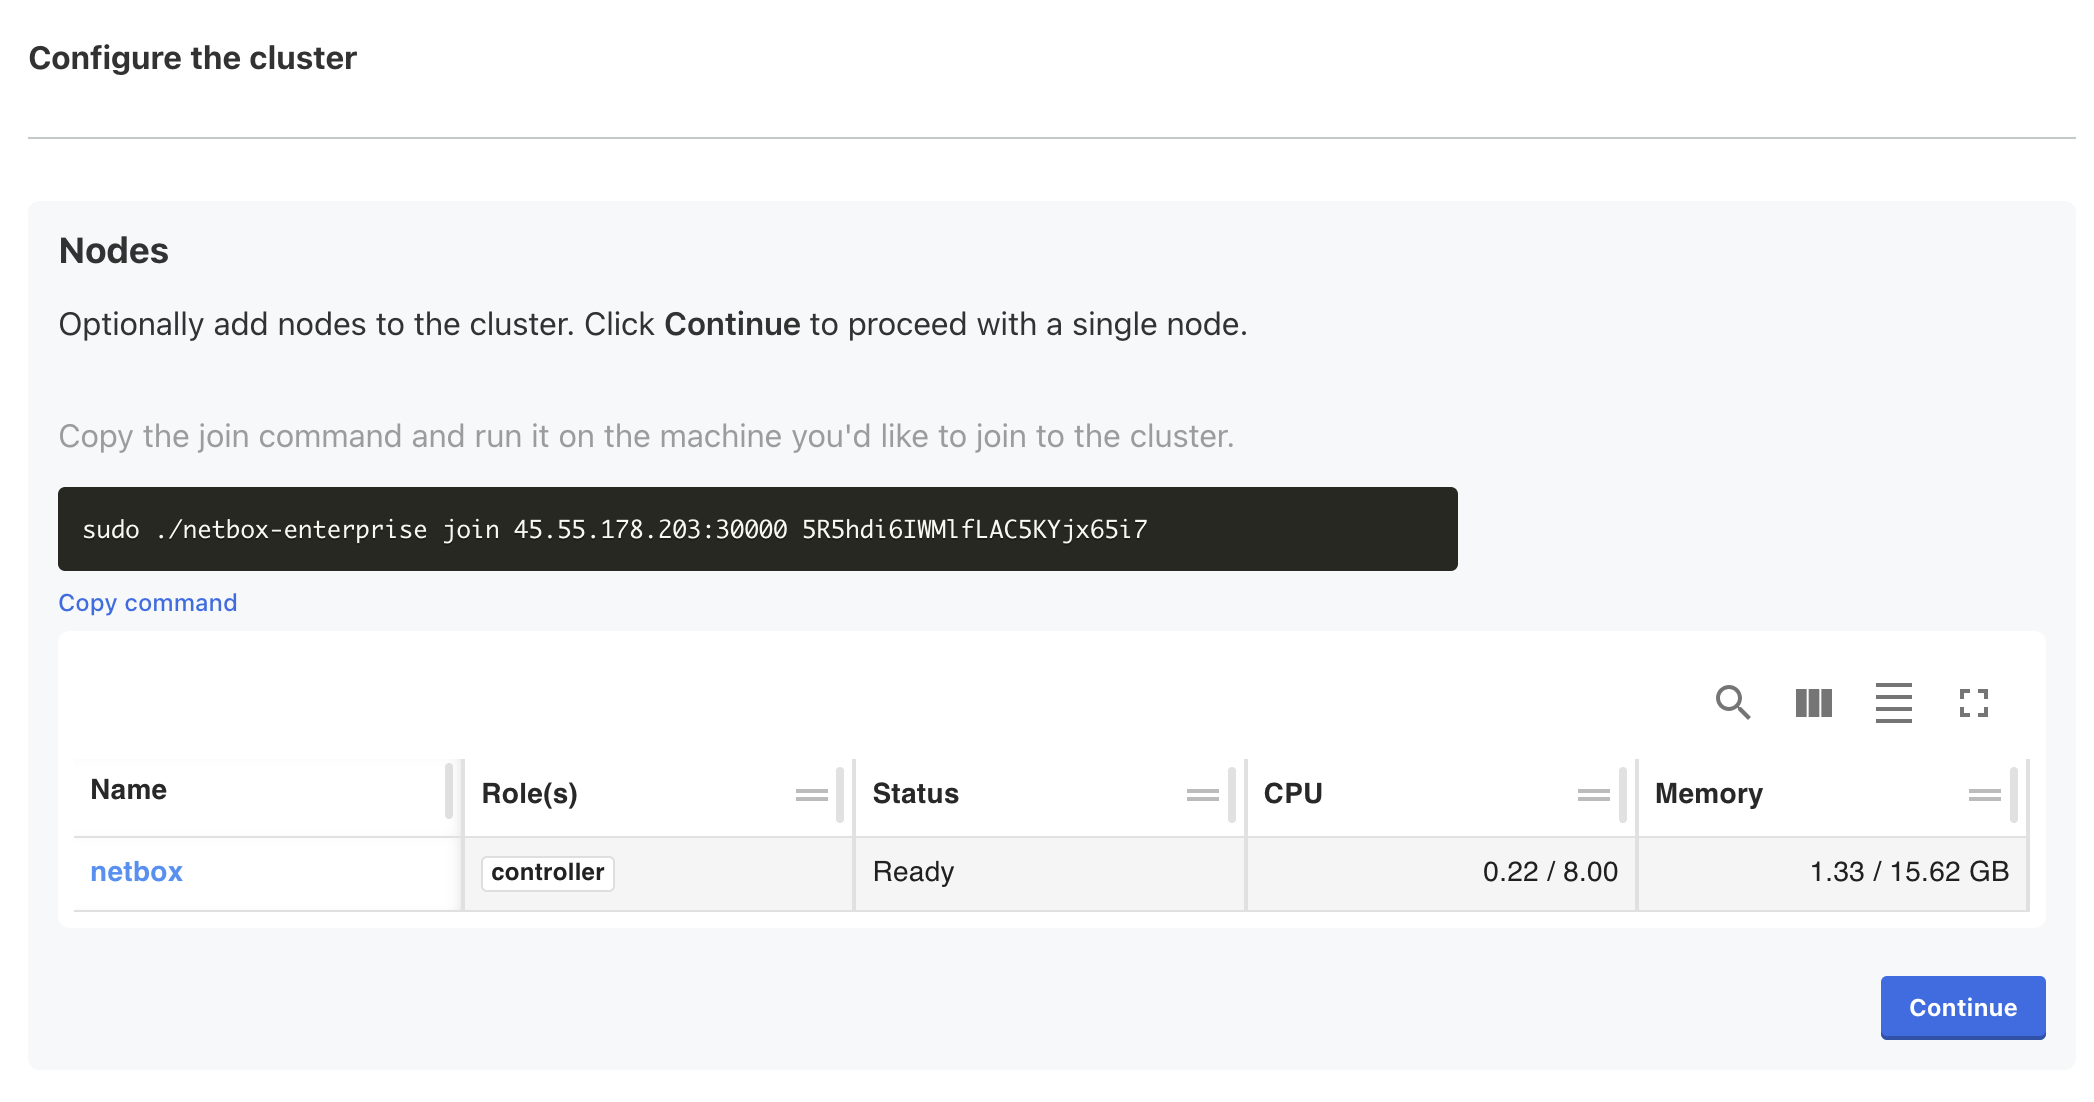
Click Continue without adding nodes. Additional nodes can be added after installation if your license includes multi-node entitlements.
Phase 3: Configure NetBox Application
Step 7: Create NetBox Superuser
Configure the initial NetBox superuser account:
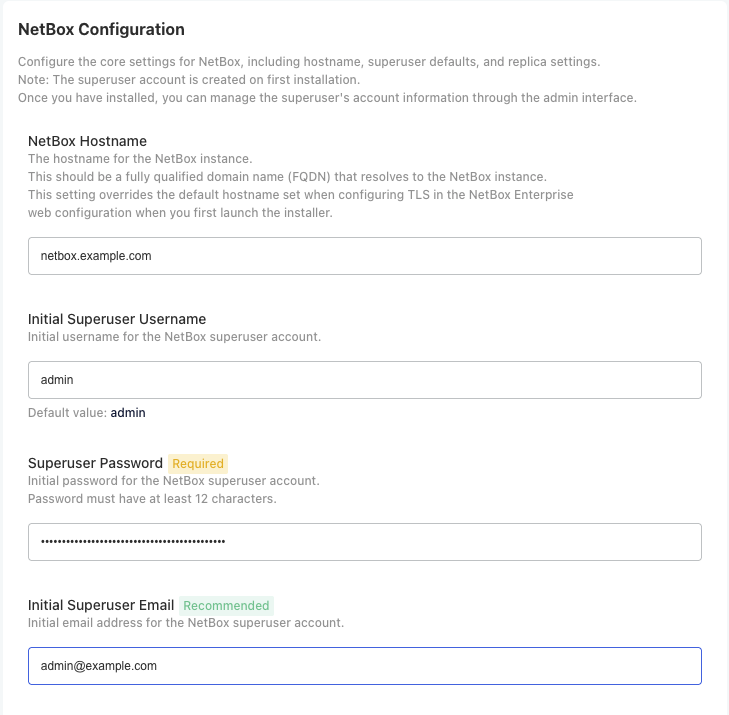
Superuser Configuration:
| Field | Description | Example |
|---|---|---|
| Hostname | NetBox FQDN | netbox.example.com |
| Username | NetBox admin username | admin |
| Administrator email address | admin@example.com | |
| Password | NetBox initial admin password | (secure password) |
!!! tip Password Management Save this password securely. You'll use it to log in to NetBox after deployment.
!!! warning One Time NetBox Admin Password The NetBox admin password is only set on initial installation and cannot be reset from the admin console later (you must use advanced tools to reset it on the command line).
Step 8: Configure Replicas and Resources
Set the number of NetBox application replicas and resource allocation:
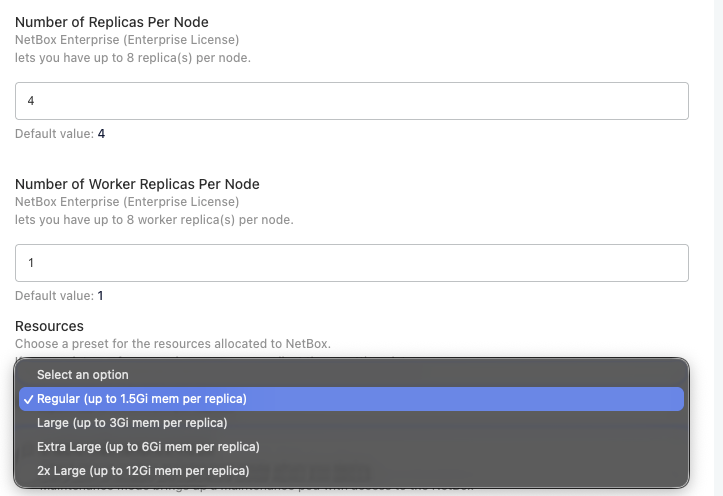
Replica Configuration:
| Setting | Recommended | Notes |
|---|---|---|
| Initial Installation | 1 replica | Start with 1 for faster initial deployment |
| Production (After Setup) | 2-3 replicas | Increase after verifying installation |
Resource Presets:
| Preset | Memory per Replica | Use Case |
|---|---|---|
| Regular (Default) | Up to 1.5Gi | Standard workloads |
| Large | Up to 3Gi | Moderate to heavy workloads |
| Extra Large | Up to 6Gi | Very large repositories or datasets |
| 2x Large | Up to 12Gi | Repositories over 1GB or high-memory operations |
Choose the preset based on your workload requirements. You can adjust this later if needed.
Do not enable Restore Mode during initial installation. Only use Restore Mode when migrating existing data.
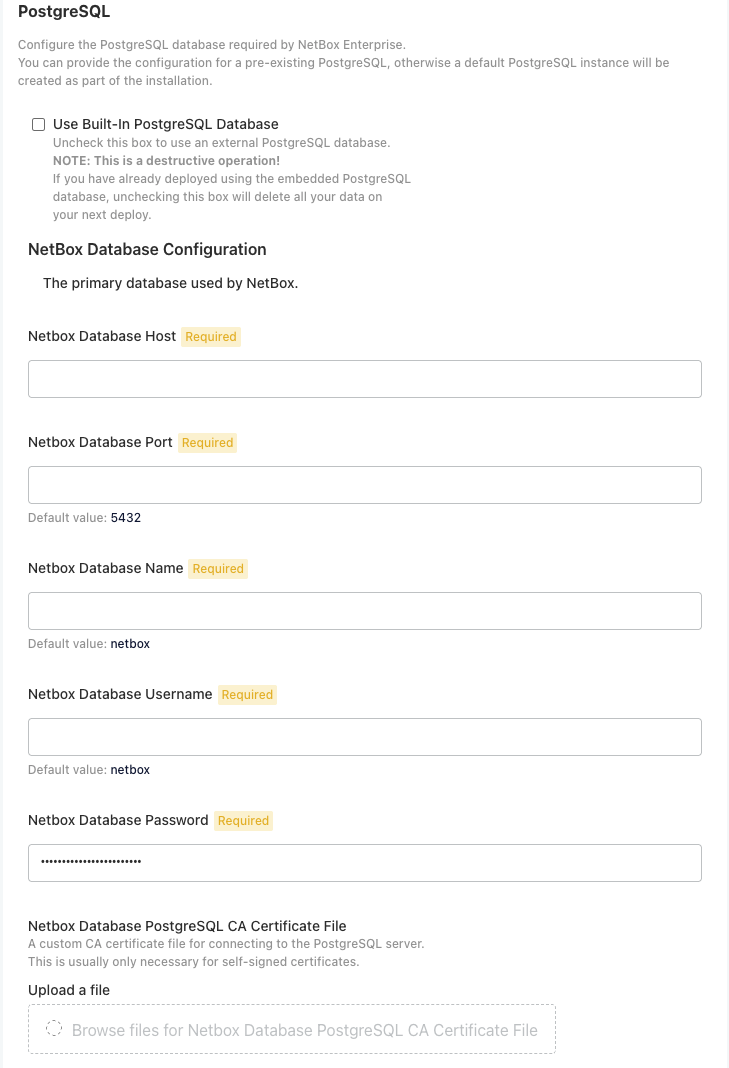
Step 9: Configure Database (PostgreSQL)
Choose between embedded PostgreSQL or external database:
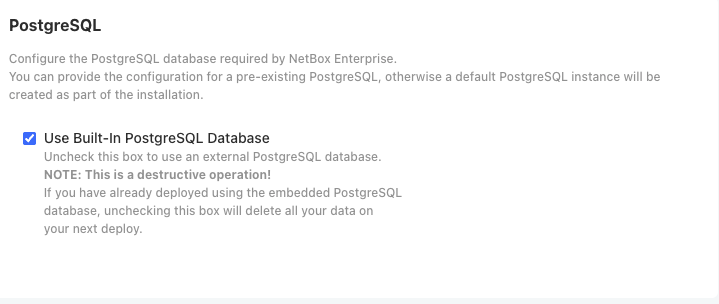
Option A: Built-in PostgreSQL (Recommended)
No configuration required. Automatically managed and included in cluster backups.
Option B: External PostgreSQL
For existing managed databases (AWS RDS, Cloud SQL, etc.). Requires hostname, port, database name, and credentials.
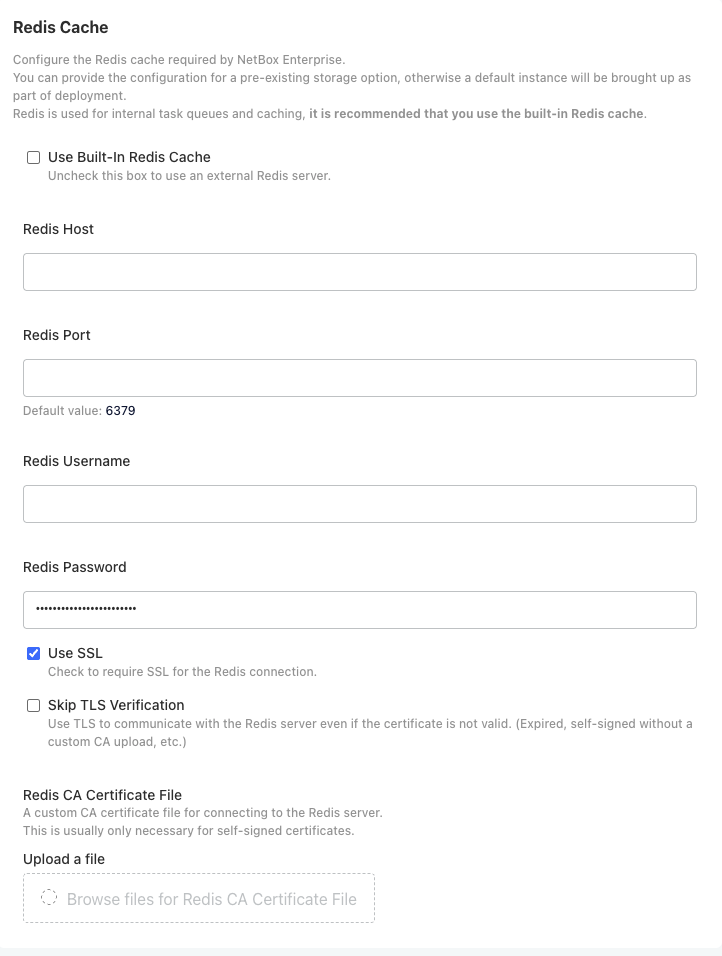
Step 10: Configure Cache (Redis)
Choose between embedded Redis or external cache:
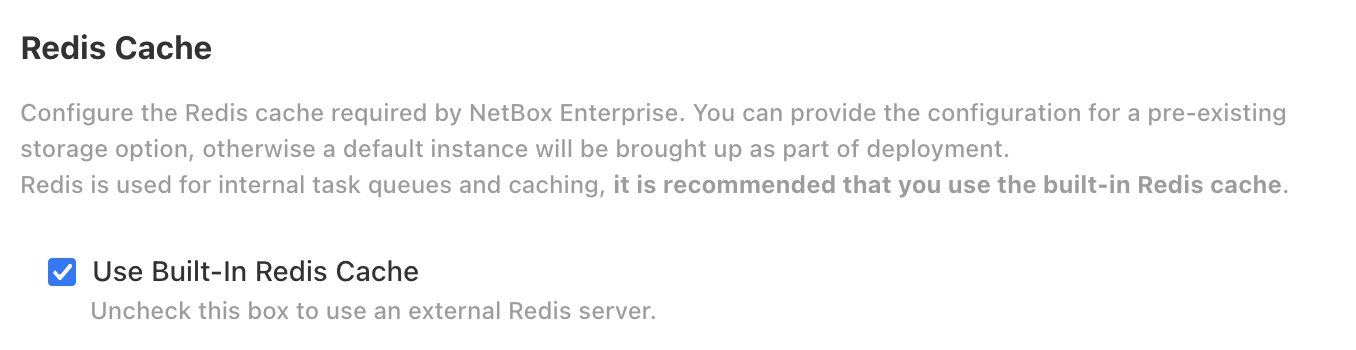
Option A: Built-in Redis (Recommended)
No configuration required. Automatically managed.
Option B: External Redis
For existing managed cache (AWS ElastiCache, etc.). Requires hostname, port, and password if authentication is enabled.
Step 11: Accept Terms of Service
Accept the NetBox Enterprise Terms of Service to proceed with deployment:
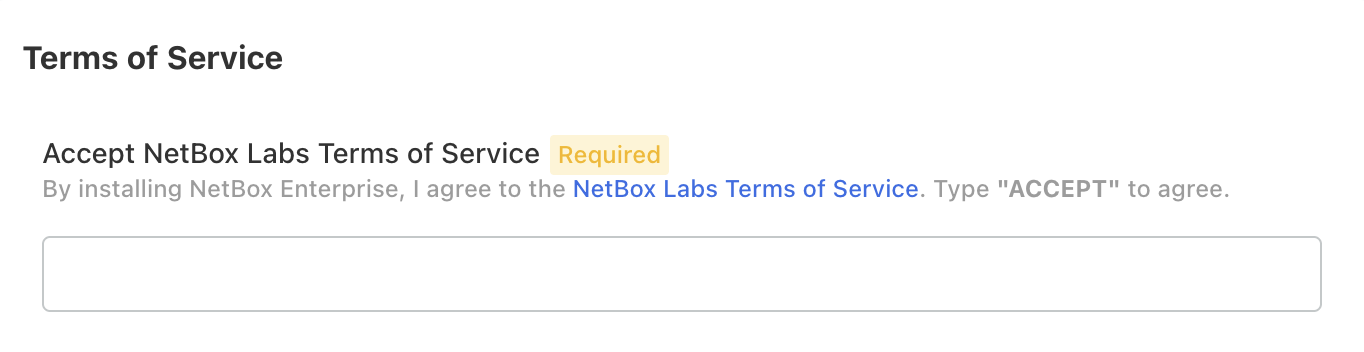
Type ACCEPT (case-insensitive) and click Continue.
Phase 4: Deploy and Verify
Step 12: Run Pre-flight Checks
The installer runs pre-flight checks to verify system readiness:
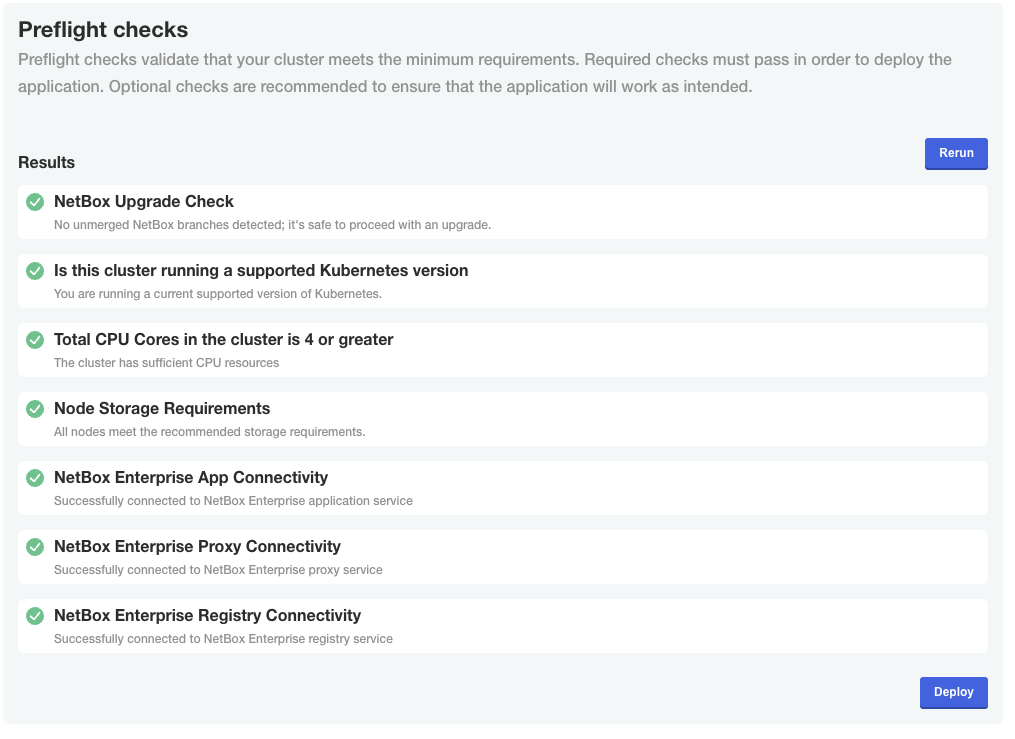
Pre-flight Checks Verify:
- Sufficient system resources (CPU, memory, disk)
- Required network ports are available
- Kernel modules loaded
- System configuration meets requirements
If checks fail, review error messages and correct issues before proceeding.
Step 13: Deploy NetBox
Click Deploy to start the NetBox application deployment.
You'll be redirected to the Admin Console Dashboard showing deployment status:
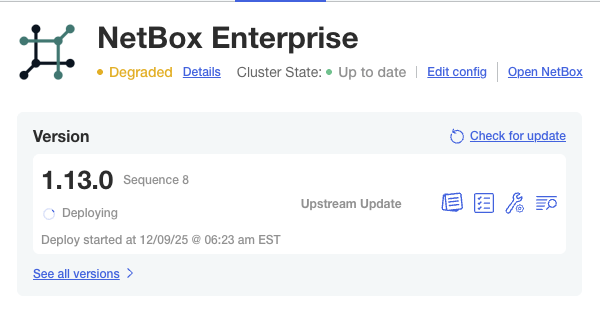
Deployment Process:
The initial deployment performs:
- Pull container images from registry
- Start NetBox application pods
- Initialize PostgreSQL database
- Run database migrations
- Configure NGINX ingress
- Health check all services
Expected Duration: 10-15 minutes for initial deployment
Step 14: Verify Deployment Success
Monitor the dashboard until status changes to Ready:
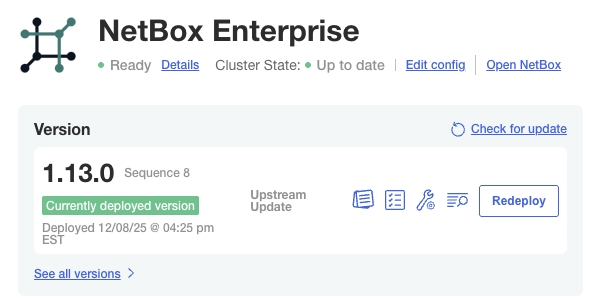
When Status Shows Ready:
- NetBox is fully initialized
- Database migrations completed
- Application is accessible on ports 80 and 443
Step 15: Access NetBox
Once deployed, access NetBox via web browser:
http://your-hostname
Or for HTTPS (with valid TLS certificate):
https://your-hostname
Log in with your superuser credentials:
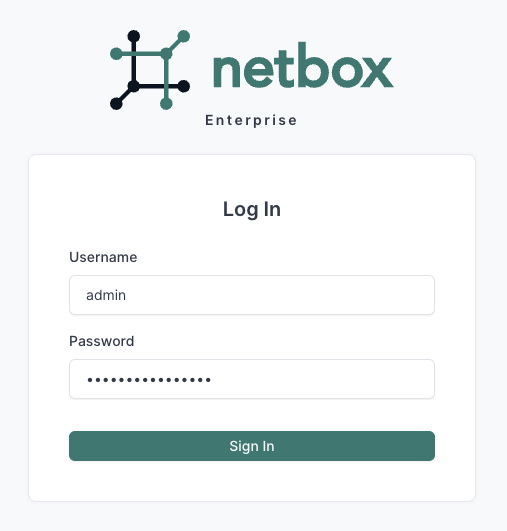
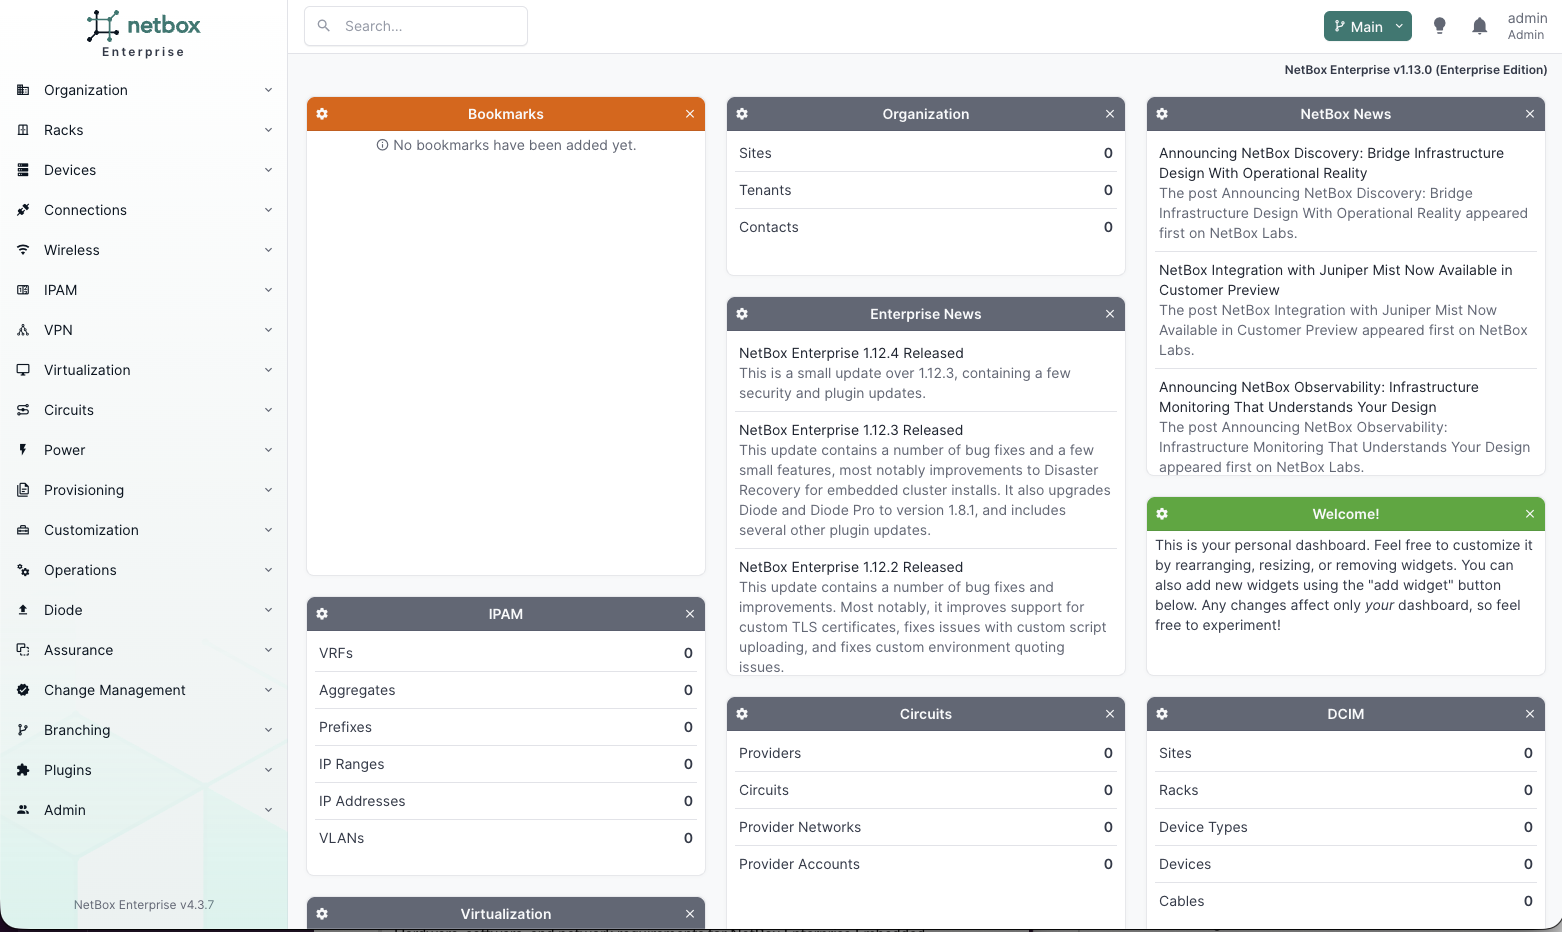
Verify successful login:
Post-Installation
| Task | Instructions |
|---|---|
| Increase replicas (production) | Admin Console > Config > Number of Replicas > Save > Deploy |
| Configure authentication | SAML, Azure AD, OIDC, LDAP |
| Install plugins | Built-in plugins, Custom plugins |
| Configure backups | Backup guide |
| Migrate existing data | Migration guide |
Troubleshooting
For detailed troubleshooting, see the Troubleshooting Guide.
| Issue | Quick Check |
|---|---|
| Installation fails | Verify swap disabled (swapon --show), kernel modules loaded, disk space available |
| Cannot access Admin Console | Check systemctl status k0scontroller and firewall allows port 30000 |
| Deployment stuck "Unavailable" | Check pod status: sudo /var/lib/embedded-cluster/bin/kubectl get pods -A |
| Pre-flight checks fail | Review failure message; common causes: disk space, port conflicts, missing kernel modules |
| Cannot log in to NetBox | Verify pods running; reset password via Admin Console > Config |
Reset and retry installation:
sudo ./netbox-enterprise reset
sudo ./netbox-enterprise install --license license.yaml